nginx+tomcat 通过域名访问项目的实例
之前对于使用域名如何访问项目很好奇,但苦于搞一个自己的域名实在是太麻烦了,还需要去买,各种提交资料,等待审核,备案。。。现在手上没什么项目,也什么事情,想着折腾折腾。。。
看着腾讯服务器打折,花了40块钱大洋买了一个最低版本的服务器(穷,没办法,反正个人用用够了),这里不得不吐槽一下腾讯,安全级别设那么高干嘛,直接远程登录不行,因为ip都ping不通,还有各种端口、命令全部禁掉,因为之前用过阿里云,安全级别没这么高,折腾了大半天,配置如下

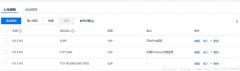
然后开始正式操作,先随便搭个项目,能访问就行,通过tomcat启动,输入:8080/demo/login/index.do进入页面,接下来需要把localhost换成我之前买的域名,之前没搞过,直接问度娘,查到说是tomcat中的server.xml配置需要更改,把里面的localhost改为自己的域名,端口号改为商用端口号80,但很可惜,没成功,启动后访问不到页面(这里可能有我配置的原因,还有其他我没注意了解到的配置,看到文章的大神可以给与我指导),换用其他的方法,度娘上查到,域名是需要进行解析的,配置如下

记录值为使用服务器的域名,启动系统,访问:8080/demo/login/index.do页面访问成功,算上小小的搞定了。
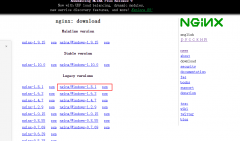
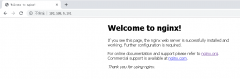
之后我们需要使用nginx+tomcat的方式访问,简单的体验一下负载均衡,下了一个windows版的nginx,直接点击nginx.exe,一闪而过,访问进入页面

之后启动两个tomcat,端口分别是8081和8082,nginx端口为8080,之后配置nginx.conf文件
1
2
3
4
5
6
7
8
9
10
11
12
13
14
15
16
17
18
19
20
21
22
23
24
25
26
27
28
29
30
31
32
33
34
35
36
37
38
39
40
#user nobody;
worker_processes 1;
#error_log logs/error.log;
#error_log logs/error.log notice;
#error_log logs/error.log info;
#pid logs/nginx.pid;
events {
worker_connections 1024;
}
http {
include mime.types;
default_type application/octet-stream;
#log_format main '$remote_addr - $remote_user [$time_local] "$request" '
# '$status $body_bytes_sent "$http_referer" '
# '"$http_user_agent" "$http_x_forwarded_for"';
#access_log logs/access.log main;
sendfile on;
#tcp_nopush on;
#keepalive_timeout 0;
keepalive_timeout 65;
#gzip on;
upstream lssxxxyss.com{
server 139.199.127.123:8081 weight=1; #weight为权重,可以看做是访问次数的比重
server 139.199.127.123:8082 weight=2;
}
server {
listen 8080;
server_name lssxxxyss.com ;
#charset koi8-r;
#access_log logs/host.access.log main;
location / {
#root html;
#index index.html index.htm;
proxy_pass http://lssxxxyss.com;
}
#error_page 404 /404.html;
。。。以下忽略。。。
}
接下来访问页面,输入地址:8080/sshDemo/login/index.do,多次访问后显示出不同的页面(为了区分两个tomcat中项目的登录页面,体现出确实是负载均衡了一下)


finish!!!
补充知识:Nginx配置java项目在Tomcat下访问
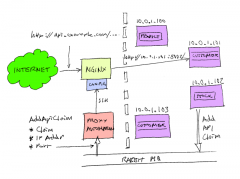
原理是使用nginx的反向代理
Nginx 安装路径一般为: /usr/local/nginx

1
2
3
4
5
6
7
8
9
10
11
12
13
14
15
16
17
18
19
20
21
22
23
24
25
26
27
28
29
30
31
32
33
34
35
在这里插入代码片
> |-- client_body_temp
|-- conf #这是Nginx所有配置文件的目录,极其重要
| |-- fastcgi.conf #fastcgi相关参数的配置文件
| |-- fastcgi.conf.default #fastcgi.conf的原始备份
| |-- fastcgi_params #fastcgi的参数文件
| |-- fastcgi_params.default
| |-- koi-utf
| |-- koi-win
| |-- mime.types #媒体类型,
| |-- mime.types.default
| |-- nginx.conf #这是Nginx默认的主配置文件
| |-- nginx.conf.default
| |-- scgi_params #scgi相关参数文件,一般用不到
| |-- scgi_params.default
| |-- uwsgi_params #uwsgi相关参数文件,一般用不到
| |-- uwsgi_params.default
| `-- win-utf
|-- fastcgi_temp #fastcgi临时数据目录
|-- html #这是编译安装时Nginx的默认站点目录,类似
Apache的默认站点htdocs目录
| |--50x.html # 错误页面优雅替代显示文件,例如:出现502错误时会调用此页面
# error_page 500502503504 /50x.html;
| `-- index.html # 默认的首页文件,首页文件名字是在nginx.conf中事先定义好的。
|-- logs #这是Nginx默认的日志路径,包括错误日志及访问日志
| |-- access.log # 这是Nginx的默认访问日志文件,使用tail -f access.log,可以实时观看网站用户访问情况信息
| |-- error.log # 这是Nginx的错误日志文件,如果Nginx出现启动故障等问题,一定要看看这个错误日志
| `-- nginx.pid # Nginx的pid文件,Nginx进程启动后,会把所有进程的ID号写到此文件
|-- proxy_temp #临时目录
|-- sbin #这是Nginx命令的目录,如Nginx的启动命令nginx
| `-- nginx #Nginx的启动命令nginx
|-- scgi_temp #临时目录
`-- uwsgi_temp #临时目录
9 directories,21 files
在其/usr/local/nginx目录下创建vhost目录,然后在vhosts文件夹下创建一个tomcats.conf文件
tomcats.conf文件内容如下:
例如:这个有两个java 项目需要用到Tomcat访问,配置如下
1
2
3
4
5
6
7
8
9
10
11
12
13
14
15
16
17
18
19
20
21
22
23
24
25
26
27
28
29
30
31
32
33
34
35
36
37
38
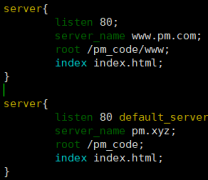
server
{
listen 80;
server_name ce1.xdr630.top;#访问tomcat服务的域名
#charset koi8-r;
#access_log logs/host.access.log main;
location / {
proxy_pass http://127.0.0.1:8081;#tomcat服务的地址
root html;
index index.html index.htm;
}
error_page 500 502 503 504 /50x.html;
location = /50x.html {
root html;
}
}
server
{
listen 80;
server_name ce2.xdr630.top;#访问tomcat服务的域名
#charset koi8-r;
#access_log logs/host.access.log main;
location / {
proxy_pass http://127.0.0.1:8082;#tomcat服务的地址
root html;
index index.html index.htm;
}
error_page 500 502 503 504 /50x.html;
location = /50x.html {
root html;
}
}
打开nginx安装目录下的conf下的nginx.conf文件 (我的目录是 /usr/local/nginx/conf/nginx.conf)
在文件底部加上
include /usr/local/nginx/vhosts/IT之家; (包含所有虚拟机主机文件)
然后在文件中间找到
1
2
3
4
5
location / {
proxy_pass http://192.168.0.148:8080; (加上这个,指定自己本机的tomcat的地址)
root html;
index index.html index.htm;
}
重启tomcat,nginx。其实Nginx一般是不用重启的,它可以通过与-s参数调用可执行来控制
重载配置文件:
/usr/local/nginx/sbin/nginx -t //先检查语法是否有误
/usr/local/nginx/sbin/nginx -s reload //再重载配置
查看Nginx启动情况:
ps -a | grep nginx
也可以重启nginx服务 lnmp restart 即可直接通过域名访问到tomcat服务
补充:
启动Nginx查看帮助:./nginx -h
启动Nginx:cd sbin ; ./nginx
以上这篇nginx+tomcat 通过域名访问项目的实例就是小编分享给大家的全部内容了,希望能给大家一个参考,也希望大家多多支持聚合云库文库。
原文链接:https://blog.csdn.net/lss1351396825/article/details/81778394
相关热词: 实例
本站内容来源于网络,如有侵权请与我们联系,我们会及时删除,我们深感抱歉!
注:本站所有信息仅供用于网络技术学习参考,学习中请遵循相关法律法规!
本文地址: https://v30.fanwenzhu.com/server/nginx/8801.shtml
相关文章
热门TAG
win10 ecshop 主机 阿里云 解决 配置 C# C++ 解析 SQL语句 命令 Go语言 方法 CSS3 HTML5 CSS win7 MSSQL 服务器配置 IIS7.5 IIS7 IIS6 IIS CentOS 7 Linux oracle数据库 oracle phpcms discuz discuz教程最新文章
-
 并且强制用 HTTPS 访问 fa
时间:2021-01-14
-
 可以控制访问量
时间:2021-01-14
-
 (通配符在前) ③server
时间:2021-01-14
-
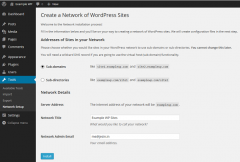 Nginx环境下WordPress的多站点
时间:2021-01-05
-
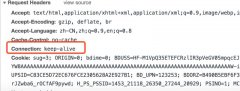 nginx keepalive的具体使用
时间:2021-01-05
-
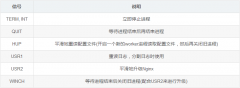 Nginx的信号控制
时间:2021-01-05
-
 win10上安装nginx的方法步骤
时间:2020-12-29
-
 linux下 nginx监控问题
时间:2020-12-29
热门文章
-
可以控制访问量
时间:2021-01-14
-
Nginx环境下WordPress的多站点功能配置详解
时间:2021-01-05
-
 Nginx搭建负载均衡集群的实现
时间:2020-12-24
-
 使用Nginx实现灰度发布的使用
时间:2020-12-25
-
 nginx+tomcat 通过域名访问项目的实例
时间:2020-12-25
-
 Keepalived+Lvs+Nginx搭建Nginx高可用集群
时间:2020-12-23
-
 详解Nginx之Location配置(Location匹配顺序)
时间:2020-12-28
-
 详解基于centos7搭建Nginx网站服务器(包含
时间:2020-12-28
-
 详解Nginx如何配置Web服务器的示例代码
时间:2020-12-25
-
 自动化Nginx服务器的反向代理的配置方法
时间:2020-12-25