使用nginx+二级域名+https支持
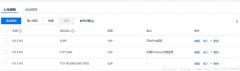
第一步:在阿里云主域名下解析添加二级域名

第二步在阿里云云盾中购买https协议,并绑定域名, 如果只为测试建议购买免费版的

第三步在nginx中配置二级域名的server
nginx配置 http走的是80端口

nginx配置 https走的是443端口

二级域名配属nginx有多种方法本人在这是用nginx导入文件夹所有的二级域名配置与主域名配置分离开来,避免耦合过深
导入二级域名所在目录文件夹到nginx中
二级域名所在目录

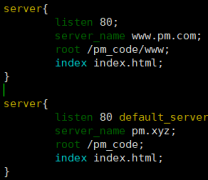
二级域名配置如下

最后一步 进入nginx的sbin目录 通过 ./nginx -t 命令查看配置是否出错
配置ok 则用命令./nginx -s reload 重启 则https应用成功
在后端代码也要配属https服务,详细请查阅资料
补充知识:nginx域名重定向遇到的问题
应客户要求,需要给客户配个域名,然后我们的大牛强哥 建议后台不要配备域名服务器了,这样不安全,一般都是对外的web服务器才配置域名;
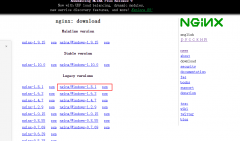
结合另外收藏的一个博文安装nginx,然后修改配置文件如下:
---一个域名对应一个conf文件;;;
1
2
3
4
5
6
7
8
9
10
11
12
13
14
15
16
17
18
19
20
21
22
23
24
25
26
27
28
29
30
31
32
33
server {
listen 80; ——————————固定端口80
server_name A B; ——————逗号间隔一级域名、二级域名
location / {
root /alidata1/tomcat-tes/……;————————服务器绝对路径 根目录
index index.html index.htm index.jsp;
proxy_send_timeout 1200;
proxy_connect_timeout 1200;
proxy_pass http://121.41.IT之家.216IT之家;——————————要比对的地址
proxy_set_header X-Real-IP $remote_addr;
proxy_set_header X-Forwarded-For $proxy_add_x_forwarded_for;
proxy_set_header Host $http_host;
}
location /share {————————服务器业务模块二级路径
index index.html index.htm index.jsp;
proxy_send_timeout 1200;
proxy_connect_timeout 1200;
proxy_pass http://121.4IT之家;
proxy_set_header X-Real-IP $remote_addr;
proxy_set_header X-Forwarded-For $proxy_add_x_forwarded_for;
proxy_set_header Host $http_host;
}
location /chao {
index index.html index.htm index.jsp;
proxy_send_timeout 1200;
proxy_connect_timeout 1200;
proxy_pass http://121.41.4IT之家/;
proxy_set_header X-Real-IP $remote_addr;
proxy_set_header X-Forwarded-For $proxy_add_x_forwarded_for;
proxy_set_header Host $http_host;
}
}
修改完了之后要重启nginx 命令: service nginx restart
如果有必要还重启一下tomcat,
配置第二个域名,同一目录下的另外一个端口登陆地址,则需要另外再建一个conf文件
以上这篇使用nginx+二级域名+https支持就是小编分享给大家的全部内容了,希望能给大家一个参考,也希望大家多多支持聚合云库文库。
原文链接:https://blog.csdn.net/zf5250/article/details/80429795
相关热词:
本站内容来源于网络,如有侵权请与我们联系,我们会及时删除,我们深感抱歉!
注:本站所有信息仅供用于网络技术学习参考,学习中请遵循相关法律法规!
本文地址: https://v30.fanwenzhu.com/server/nginx/8800.shtml
相关文章
热门TAG
win10 ecshop 主机 阿里云 解决 配置 C# C++ 解析 SQL语句 命令 Go语言 方法 CSS3 HTML5 CSS win7 MSSQL 服务器配置 IIS7.5 IIS7 IIS6 IIS CentOS 7 Linux oracle数据库 oracle phpcms discuz discuz教程最新文章
-
 并且强制用 HTTPS 访问 fa
时间:2021-01-14
-
 可以控制访问量
时间:2021-01-14
-
 (通配符在前) ③server
时间:2021-01-14
-
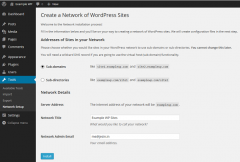 Nginx环境下WordPress的多站点
时间:2021-01-05
-
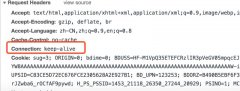 nginx keepalive的具体使用
时间:2021-01-05
-
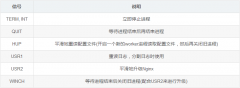 Nginx的信号控制
时间:2021-01-05
-
 win10上安装nginx的方法步骤
时间:2020-12-29
-
 linux下 nginx监控问题
时间:2020-12-29
热门文章
-
可以控制访问量
时间:2021-01-14
-
Nginx环境下WordPress的多站点功能配置详解
时间:2021-01-05
-
 Nginx搭建负载均衡集群的实现
时间:2020-12-24
-
 使用Nginx实现灰度发布的使用
时间:2020-12-25
-
 nginx+tomcat 通过域名访问项目的实例
时间:2020-12-25
-
 Keepalived+Lvs+Nginx搭建Nginx高可用集群
时间:2020-12-23
-
 详解Nginx之Location配置(Location匹配顺序)
时间:2020-12-28
-
 详解基于centos7搭建Nginx网站服务器(包含
时间:2020-12-28
-
 详解Nginx如何配置Web服务器的示例代码
时间:2020-12-25
-
 自动化Nginx服务器的反向代理的配置方法
时间:2020-12-25