layui树怎么清空
layui树清空的方法:首先创建一个树框;然后在原有的树干上添加树杈;再在之前的基础上添加树枝;接着在之前的基...

layui树怎么清空
首先创建一个树框:
<fieldset class="layui-elem-field layui-field-title" style="margin-top: 20px;"> <legend>基本树</legend> </fieldset> <div style="display: inline-block; width: 180px; height: 210px; padding: 10px; border: 1px solid #ddd; overflow: auto;"> </div>

在原有的树干上添加树杈:
layui.use(['tree', 'layer'], function(){ var layer = layui.layer ,$ = layui.jquery; layui.tree({ elem: '#demo1' //指定元素 ,target: '_blank' //是否新选项卡打开(比如节点返回href才有效) ,click: function(item){ //点击节点回调 layer.msg('当前节名称:'+ item.name + '<br>全部参数:'+ JSON.stringify(item)); console.log(item); } ,nodes: [ //节点 { name: '树干' ,id: 2 ,spread: true ,children: [ { name: '树杈1' ,id: 21 ,spread: true }, { name: '树杈2' ,id: 22 } ] } ] });
再在之前的基础上添加树枝:
layui.tree({ elem: '#demo1' //指定元素 ,target: '_blank' //是否新选项卡打开(比如节点返回href才有效) ,click: function(item){ //点击节点回调 layer.msg('当前节名称:'+ item.name + '<br>全部参数:'+ JSON.stringify(item)); console.log(item); } ,nodes: [ //节点 { name: '树干' ,id: 2 ,spread: true ,children: [ { name: '树杈1' ,id: 21 ,spread: true ,children: [ { name: '树枝' ,id: 211 } ] }, { name: '树杈2' ,id: 22 ,children: [ { name: '树枝' ,id: 221 } ] } ] } ] });
再在之前的基础上添加树叶:
layui.tree({ elem: '#demo1' //指定元素 ,target: '_blank' //是否新选项卡打开(比如节点返回href才有效) ,click: function(item){ //点击节点回调 layer.msg('当前节名称:'+ item.name + '<br>全部参数:'+ JSON.stringify(item)); console.log(item); } ,nodes: [ //节点 { name: '树干' ,id: 2 ,spread: true ,children: [ { name: '树杈1' ,id: 21 ,spread: true ,children: [ { name: '树枝' ,id: 211 ,children: [ { name: '树叶1' ,id: 2111 }, { name: '树叶2' ,id: 2112 }, { name: '树叶3' ,id: 2113 } ] } ] }, { name: '树杈2' ,id: 22 ,children: [ { name: '树枝' ,id: 221 } ] } ] } ] });
添加个清空的按钮:
<button class="layui-btn">清空</button>
点击清空按钮,调用点击事件清除树
$(".layui-btn").click(function(){ $('ul li').remove(); });
方法/步骤2
完整代码:
<!DOCTYPE html> <html> <head> <meta charset="utf-8"> <title>layui</title> <meta name="renderer" content="webkit"> <meta http-equiv="X-UA-Compatible" content="IE=edge,chrome=1"> <meta name="viewport" content="width=device-width, initial-scale=1, maximum-scale=1"> <link rel="stylesheet" href=https://www.ym97.com/layui/"/res.layui.com/layui/dist/css/layui.css" media="all"> <!-- 注意:如果你直接复制所有代码到本地,上述css路径需要改成你本地的 --> </head> <body> <fieldset class="layui-elem-field layui-field-title" style="margin-top: 20px;"> <legend>基本树</legend> </fieldset> <div style="display: inline-block; width: 180px; height: 210px; padding: 10px; border: 1px solid #ddd; overflow: auto;"> <ul id="demo1"></ul> </div> <button class="layui-btn">清空</button> <script src=https://www.ym97.com/layui/"/res.layui.com/layui/dist/layui.js" charset="utf-8"></script> <!-- 注意:如果你直接复制所有代码到本地,上述js路径需要改成你本地的 --> <script> //Demo layui.use(['tree', 'layer'], function(){ var layer = layui.layer ,$ = layui.jquery; layui.tree({ elem: '#demo1' //指定元素 ,target: '_blank' //是否新选项卡打开(比如节点返回href才有效) ,click: function(item){ //点击节点回调 layer.msg('当前节名称:'+ item.name + '<br>全部参数:'+ JSON.stringify(item)); console.log(item); } ,nodes: [ //节点 { name: '树干' ,id: 2 ,spread: true ,children: [ { name: '树杈1' ,id: 21 ,spread: true ,children: [ { name: '树枝' ,id: 211 ,children: [ { name: '树叶1' ,id: 2111 }, { name: '树叶2' ,id: 2112 }, { name: '树叶3' ,id: 2113 } ] } ] }, { name: '树杈2' ,id: 22 ,children: [ { name: '树枝' ,id: 221 } ] } ] } ] }); $(".layui-btn").click(function(){ $('ul li').remove(); }); }); </script> </body> </html>更多Layui相关技术文章,请访问Layui框架教程栏目进行学习!
以上就是layui树怎么清空的详细内容,更多请关注php中文网其它相关文章!
相关热词:
本站内容来源于网络,如有侵权请与我们联系,我们会及时删除,我们深感抱歉!
注:本站所有信息仅供用于网络技术学习参考,学习中请遵循相关法律法规!
本文地址: https://v30.fanwenzhu.com/jiaob/cssm/5732.shtml
下一篇:html5实现表单的复选框验证
相关文章
热门TAG
win10 ecshop 主机 阿里云 解决 配置 C# C++ 解析 SQL语句 命令 Go语言 方法 CSS3 HTML5 CSS win7 MSSQL 服务器配置 IIS7.5 IIS7 IIS6 IIS CentOS 7 Linux oracle数据库 oracle phpcms discuz discuz教程最新文章
-
 其中border-left决定了底部直
时间:2021-01-23
-
 当你自己回头来看你写的
时间:2021-01-23
-
 ④格式标签 粗体:b/b 斜
时间:2021-01-23
-
 我们直接看代码: !DOCTY
时间:2021-01-23
-
 这里就是吐槽的IE6!) 图
时间:2021-01-23
-
 假设我们的HTML代码如下:
时间:2021-01-23
-
 那么使用 CSS3 新增的选择
时间:2021-01-23
-
 scaleGlassRectangle.y
时间:2021-01-23
热门文章
-
 可以加我的HTML5前端交流群111645711 CSS源码
时间:2021-01-15
-
 就可以对子元素进行 3D 变形操作了
时间:2021-01-12
-
 用css让一个容器水平垂直
时间:2021-01-12
-
 而没有设置高度
时间:2021-01-19
-
 canvas与html5实现视频截图成果
时间:2021-01-19
-
 所以通常不需要发送
时间:2021-01-19
-
 我们尝试一下更新一下HTML结构
时间:2021-01-23
-
scaleGlassRectangle.y
时间:2021-01-23
-
 HTML5生拖放实例分析
时间:2021-01-12
-
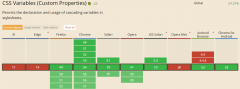 在全局:root{ }伪类中定义了一个 CSS 变量
时间:2021-01-21