HTML+CSS+JS 模仿 Win10 亮度调节效果
这篇文章主要介绍了HTML+CSS+JS模仿win10亮度调节效果的示例代码,本文通过实例代码给大家介绍的非常详细,对大家的学...
<!doctype html>
<html>
<head>
<meta charset="utf-8">
<title>模仿win10的亮度调节</title>
<style>
.control_bar{
height:200px;
width:500px;
border-bottom:3px solid #888888;
}
.control_bar_cursor{
height:25px;
width:8px;
background: #505151;
border-radius:5px;
margin-top:-12.5px;
position:relative;
top:0;
left:0;
}
.control_bar_cursor:hover{
background:white;
}
#control_bar_mask{
margin-top:-203px;
width:0px;
}
.mask{
position:fixed;
bottom:0;
top:0;
left:0;
right:0;
background:black;
z-index:-1;
}
</style>
</head>
<body>
<p class="mask"></p>
<p class="control_bar"></p>
<p class="control_bar" style="border-bottom:3px solid #505151;" id="control_bar_mask"></p>
<p class="control_bar_cursor"></p>
</body>
<script>
window.onload = function(){
var control_bar = document.getElementsByClassName("control_bar")[0];
var control_bar_mask = document.getElementById("control_bar_mask");
var control_bar_cursor = document.getElementsByClassName("control_bar_cursor")[0];
var def_left = control_bar_cursor.offsetLeft;
var mask = document.getElementsByClassName("mask")[0];
document.body.onmousedown = function(){
window.onmousemove = function(){
var cursor_X = event.clientX;
var cursor_Y = event.clientY;
if(cursor_X < def_left){
control_bar_cursor.style.left = 0;
}else if(cursor_X > control_bar.offsetWidth + def_left){
control_bar_cursor.style.left = control_bar.offsetWidth;
}else{
control_bar_cursor.style.left = cursor_X - def_left + "px";
}
//亮度比
var proportion = parseInt(control_bar_cursor.offsetLeft - def_left) / parseInt(control_bar.offsetWidth - 1);
control_bar_mask.style.width = proportion * control_bar.offsetWidth + "px";
mask.style.opacity = 1 - proportion;
};
window.onmouseup = function(){
window.onmousemove = null;
};
};
};
</script>
</html>
1.将各个元素的样子写出来
这里为了方便好观察给body添加了一个背景颜色
<p class="mask"></p>.mask{ position:fixed; bottom:0; top:0; left:0; right:0; background:black; z-index:-1; }window.onload = function(){ var control_bar = document.getElementsByClassName("control_bar")[0]; var control_bar_mask = document.getElementById("control_bar_mask"); var control_bar_cursor = document.getElementsByClassName("control_bar_cursor")[0]; var def_left = control_bar_cursor.offsetLeft; var mask = document.getElementsByClassName("mask")[0]; document.body.onmousedown = function(){ window.onmousemove = function(){ var cursor_X = event.clientX; var cursor_Y = event.clientY; if(cursor_X < def_left){ control_bar_cursor.style.left = 0; }else if(cursor_X > control_bar.offsetWidth + def_left){ control_bar_cursor.style.left = control_bar.offsetWidth; }else{ control_bar_cursor.style.left = cursor_X - def_left + "px"; } //亮度比 var proportion = parseInt(control_bar_cursor.offsetLeft - def_left) / parseInt(control_bar.offsetWidth - 1); control_bar_mask.style.width = proportion * control_bar.offsetWidth + "px"; mask.style.opacity = 1 - proportion; }; window.onmouseup = function(){ window.onmousemove = null; }; }; };推荐教程:《HTML教程》
以上就是HTML+CSS+JS 模仿 Win10 亮度调节效果的详细内容,更多请关注聚合云库其它相关文章!
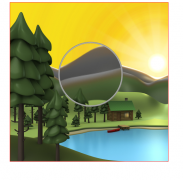
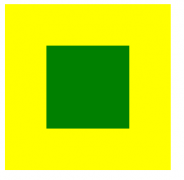
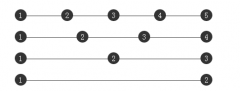
body{ background:back; } .control_bar{ height:200px; width:500px; border-bottom:3px solid #888888; } .control_bar_cursor{ height:25px; width:8px; background: #505151; border-radius:5px; }效果图
window.onload = function(){ var control_bar = document.getElementsByClassName("control_bar")[0]; var control_bar_mask = document.getElementById("control_bar_mask"); var control_bar_cursor = document.getElementsByClassName("control_bar_cursor")[0]; var def_left = control_bar_cursor.offsetLeft; document.body.onmousedown = function(){ window.onmousemove = function(){ var cursor_X = event.clientX; var cursor_Y = event.clientY; if(cursor_X < def_left){ control_bar_cursor.style.left = 0; }else if(cursor_X > control_bar.offsetWidth + def_left){ control_bar_cursor.style.left = control_bar.offsetWidth; }else{ control_bar_cursor.style.left = cursor_X - def_left + "px"; } var proportion = parseInt(control_bar_cursor.offsetLeft - def_left) / parseInt(control_bar.offsetWidth - 1); control_bar_mask.style.width = proportion * control_bar.offsetWidth + "px"; }; window.onmouseup = function(){ window.onmousemove = null; }; }; };4. 添加一个mask用控制条来控制其透明度达到亮度调节效果
css
3. 添加js
代码
js
HTML+CSS+JS模仿win10亮度调节效果


css
2. 将各个元素叠到一起
html
body{ background:black; } .control_bar{ height:200px; width:500px; border-bottom:3px solid #888888; } .control_bar_cursor{ height:25px; width:8px; background: #505151; border-radius:5px; margin-top:-12.5px; position:relative; top:0; left:0; } .control_bar_cursor:hover{ background:white; } #control_bar_mask{ margin-top:-203px; width:100px; }这里为了显示遮罩效果把遮罩层的p宽度设小了

本站内容来源于网络,如有侵权请与我们联系,我们会及时删除,我们深感抱歉!
注:本站所有信息仅供用于网络技术学习参考,学习中请遵循相关法律法规!
本文地址: https://v30.fanwenzhu.com/jiaob/cssm/4888.shtml
上一篇:html文档的基本结构由哪三
下一篇:HTML5 移动端自适应布局
相关文章
热门TAG
win10 ecshop 主机 阿里云 解决 配置 C# C++ 解析 SQL语句 命令 Go语言 方法 CSS3 HTML5 CSS win7 MSSQL 服务器配置 IIS7.5 IIS7 IIS6 IIS CentOS 7 Linux oracle数据库 oracle phpcms discuz discuz教程最新文章
-
 其中border-left决定了底部直
时间:2021-01-23
-
 当你自己回头来看你写的
时间:2021-01-23
-
 ④格式标签 粗体:b/b 斜
时间:2021-01-23
-
 我们直接看代码: !DOCTY
时间:2021-01-23
-
 这里就是吐槽的IE6!) 图
时间:2021-01-23
-
 假设我们的HTML代码如下:
时间:2021-01-23
-
 那么使用 CSS3 新增的选择
时间:2021-01-23
-
 scaleGlassRectangle.y
时间:2021-01-23
热门文章
-
 可以加我的HTML5前端交流群111645711 CSS源码
时间:2021-01-15
-
 就可以对子元素进行 3D 变形操作了
时间:2021-01-12
-
 用css让一个容器水平垂直
时间:2021-01-12
-
 而没有设置高度
时间:2021-01-19
-
 canvas与html5实现视频截图成果
时间:2021-01-19
-
 所以通常不需要发送
时间:2021-01-19
-
 我们尝试一下更新一下HTML结构
时间:2021-01-23
-
scaleGlassRectangle.y
时间:2021-01-23
-
 HTML5生拖放实例分析
时间:2021-01-12
-
 在全局:root{ }伪类中定义了一个 CSS 变量
时间:2021-01-21