服务器Centos部署MySql并连接Navicat过程详解
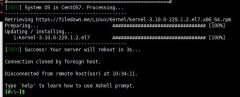
(1)服务器配置: 1 2 3 4 5 6 7 8 9 10 11 12 13 [root@localhost ~]# cd /usr/local/src/ [root@localhost src]# wget [root@localhost src]# rpm -ivh mysql57-community-release-el7-8.noarch.rpm mysql-community-client-5.7.30-1.el7.x86_64.rpm mysql-community-server-5.7.31-1.el7.x86_64.rpm 将这两个个rpm包, 0 rows affected (0.00 sec) #刷新权限 mysql flush privileges; Query OK, 0 rows affected (0.00 sec)#给新用户分权限mysql grant all privileges on *.* to user1@% with grant option; Query OK,密码 Query OK, mysql create user username@% identified by paswword;//添加新的用户。
0 rows affected (0.00 sec) Query OK。
0 rows affected (0.00 sec) #创建新的用户,以FTP形式导入:/var/cache/yum/x86_64/7/mysql57-community/packages/ [root@localhost src]# yum -y install mysql-server 等待时间较长 (2)重置密码与创建用户 1 2 3 4 5 #重启mysql服务 [root@VM-0-3-centos src]# service mysqld restart #重置密码 [root@localhost ~]# grep password /var/log/mysqld.log 1 2 3 4 5 6 7 8 9 10 #密码重置mysql alter user root@localhost identified by password;//密码重置,新的密码 Query OK,host from mysql.user; +---------------+-----------+ | user | host | +---------------+-----------+ | user1 | % | | mysql.session | localhost | | mysql.sys | localhost | | root | localhost | +---------------+-----------+ 4 rows in set (0.00 sec) mysql (4)实现在Navicat上连接 【常规】端配置参数 【SSH】端配置参数 , 0 rows affected (0.00 sec) #刷新权限 mysql flush privileges; Query OK, 0 rows affected (0.00 sec) (3)查询MySql当前用户: 1 2 3 4 5 6 7 8 9 10 11 12 mysql select user,。
相关热词:
本站内容来源于网络,如有侵权请与我们联系,我们会及时删除,我们深感抱歉!
注:本站所有信息仅供用于网络技术学习参考,学习中请遵循相关法律法规!
本文地址: https://v30.fanwenzhu.com/xt/centos/9620.shtml
相关文章
热门TAG
win10 ecshop 主机 阿里云 解决 配置 C# C++ 解析 SQL语句 命令 Go语言 方法 CSS3 HTML5 CSS win7 MSSQL 服务器配置 IIS7.5 IIS7 IIS6 IIS CentOS 7 Linux oracle数据库 oracle phpcms discuz discuz教程最新文章
-
 RedHat系统怎么设置或更改
时间:2021-01-10
-
 centos系统密码忘了怎么破
时间:2021-01-10
-
 CentOS 6.6系统桌面字体怎么
时间:2021-01-09
-
 linux系统加载raid驱动的教
时间:2021-01-09
-
 用Mac在CoreOS上搭建WordPre
时间:2021-01-06
-
 Centos php 扩展方式安装gd库
时间:2021-01-06
-
 如何安装CentOS 6.6 图文详解
时间:2020-12-29
-
 设置CentOS系统的时间同步
时间:2020-12-27
热门文章
-
用Mac在CoreOS上搭建WordPress的教程
时间:2021-01-06
-
 centos怎么安装CrossOver
时间:2020-12-23
-
 centos系统VPS服务器挂载数据盘教程
时间:2020-12-27
-
 CentOS6/7 专用破解版锐速一键安装脚本
时间:2020-12-27
-
 CentOS设置IP连接网络实现过程图解
时间:2020-12-23
-
Centos php 扩展方式安装gd库的方法
时间:2021-01-06
-
 在CentOS服务器上配置NTP服务器的教程
时间:2020-12-23
-
 CentOS系统限制普通用户切换到root管理员账
时间:2020-12-27
-
设置CentOS系统的时间同步的教程
时间:2020-12-27
-
 centos7怎么进去tmp目录并清除垃圾?
时间:2020-12-27