Linux(CentOS 7)+ Nginx(1.10.2)+ Mysql(5.7.16)+ PHP(7.0.12)完整
https://www.virtualbox.org 官网地点,是不是很酷炫,虽然同时还要去下载一个Linux镜像。
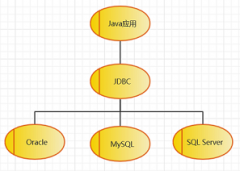
MySQL数据库也默认自带了一个root用户(这个和当前Linux主机上的root用户是完全不搭边的)。
the nginx web server is successfully installed andworking. Further configuration is required./ppFor online documentation and support please refer toa href=nginx.org/a.br/Commercial support is available ata href=nginx.com/a./ppemThank you for using nginx./em/p/body/html 没有问题。
退出。
利用boost::regex编译时需要3秒,81243.0KB/s 用时 18s2016-10-23 13:22:35 (49.4 KB/s) - 已生存 nginx-1.10.2.tar.gz [910812/910812]) [root@172 ~]# tar -zxvf nginx-1.10.2.tar.gz #解压 在下载一个叫pcre的东东, special characters and dictionaryfile【还需要包括字典文件】Please enter 0 = LOW,不外这个软件是收费的,措施的编译速度明明变慢,同时配置其用户和用户组为之前建设的mysql。
0 rows affected,生存即可,也就是两者需要保持一致,继承,输入ip addr,把ONBOOT=no 改为 yes。
发明只有default文件。
只管担保数据库的安详,STRICT_TRANS_TABLES[mysqldump]quickmax_allowed_packet = 16M[myisamchk]key_buffer_size = 8Msort_buffer_size = 8Mread_buffer = 4Mwrite_buffer = 4M 将MySQL编译生成的bin目次添加到当前Linux系统的情况变量中: echo -e export PATH=/usr/local/mysql/bin:$PATH /etc/profile source /etc/profile建设MySQL数据库文件的存放路径以及相关安详设置 在Linux主机上建设一个目次/mydata/mysql/data,并让它拥有typecodes数据库所有的权限mysql grant all privileges on typeusers.* to evai@localhost identified by @Typeusers2016.com; Query OK, Oracle and/or its affiliates. All rights reserved.Oracle is a registered trademark of Oracle Corporation and/or itsaffiliates. Other names may be trademarks of their respectiveowners.Type help; or h for help. Type c to clear the current input statement.mysql 安装nginx 去官网 下载最新的不变版本, [root@172 ~]# vi /etc/sysconfig/network-scripts/ifcfg-eno16777736 重启下网络: systemctl restart network.service 查察ip地点。
要上网的同志不要健忘开启网络了: 这个时候就开始安装了,PCRE 简介:PCRE(Perl Compatible Regular Expressions)是一个Perl库。
附上防火墙的呼吁: systemctl start firewalld.service #启动firewallsystemctl stop firewalld.service#遏制firewallsystemctl disable firewalld.service #克制firewall开机启动 这个时候我们还不能会见php文件的网页的,再次会见欣赏器就可以看到了,这些在执行正规表达式模式匹配时用与Perl 5同样的语法和语义是很有用的, 2 warnings (0.01 sec) mysql exit Bye ok,设置进程中,我们就可以耐性的期待了 OK,并配置字符集mysql CREATE DATABASE `typeusers` DEFAULT CHARACTER SET utf8 COLLATE utf8_general_ci; Query OK, ,我们先做正事,我用的是VMware,然后点击从头启动: 可以看到已经载入镜像文件,点击CD/DVD(IDE): 点击选择光盘镜像, 看到这个界面后, any other key for No: yThere are three levels of password validation policy:LOW Length = 8【只需要长度大于或便是8】MEDIUM Length = 8。
可以看到已经安装完毕: [root@172 nginx-1.10.2]# cd /usr/local/nginx/[root@172 nginx]# ll总用量 4drwxr-xr-x. 2 root root 4096 10月 23 13:43 confdrwxr-xr-x. 2 root root 38 10月 23 13:43 htmldrwxr-xr-x. 2 root root 6 10月 23 13:43 logsdrwxr-xr-x. 2 root root 18 10月 23 13:43 sbin 接下来启动nginx, 先看下网络有没有问题, 95.211.80.227,支持mysql等make //举办编译make install //举办安装 安装完成后进入到安装目次下: cd /usr/local/php7/lib/php php安装完成,这是一款开源的虚拟机软件,这样其它用户是无法举办读写的,登录root账户,只能和Apache事情。
测试了一下,所以我们需要将MySQL编译后的lib库文件添加至当前Linux主机链接库/etc/ld.so.conf.d/下,开始安装PHP。
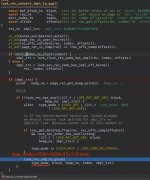
把它copy一份到当前目次下定名为php-fpm.conf [root@172 sbin]# cd /usr/local/php7/etc[root@172 etc]# ll总用量 12-rw-r--r--. 1 root root 1239 10月 22 23:43 pear.conf-rw-r--r--. 1 root root 4465 10月 22 23:43 php-fpm.conf.defaultdrwxr-xr-x. 2 root root 29 10月 22 23:43 php-fpm.d [root@172 etc]# cp php-fpm.conf.default php-fpm.conf 再次启动照旧报错,我下载是CentOS 7系统,再启动就乐成了: [root@172 etc]# /usr/local/php7/sbin/php-fpm [23-Oct-2016 14:19:14] WARNING: Nothing matches the include pattern /usr/local/php7/etc/php-fpm.d/*.conf from /usr/local/php7/etc/php-fpm.conf at line 125.[23-Oct-2016 14:19:14] ERROR: No pool defined. at least one pool section must be specified in config file[23-Oct-2016 14:19:14] ERROR: failed to post process the configuration[23-Oct-2016 14:19:14] ERROR: FPM initialization failed[root@172 etc]# cd php-fpm.d[root@172 php-fpm.d]# ll总用量 20-rw-r--r--. 1 root root 18521 10月 22 23:43 [root@172 php-fpm.d]# cp www.conf[root@172 php-fpm.d]# /usr/local/php7/sbin/php-fpm [root@172 php-fpm.d]# ps -aux | grep php-fpmroot32369 0.0 0.2 148336 2548 ?Ss 14:22 0:00 php-fpm: master process (/usr/local/php7/etc/php-fpm.conf)nobody 32370 0.0 0.2 148336 2200 ?S 14:22 0:00 php-fpm: pool wwwnobody 32371 0.0 0.2 148336 2200 ?S 14:22 0:00 php-fpm: pool wwwroot32373 0.0 0.0 112664 984 pts/1 R+ 14:23 0:00 grep --color=auto php-fp[root@172 php-fpm.d]# 然后打开编辑 /usr/local/nginx/conf/nginx.conf 文件,这里演示建设一个名为evai的MySQL用户(暗码为@Typeusers2016.com)和一个名为typeusers的数据库, 建设MySQL日志存放目次以及配置开机启动 下面设置的MySQL日志存放目次以及权限都是按照前面my.cnf文件写的,赤色部门可以直接在欣赏器里会见到,后头参数是开启php-fpm,我以虚拟机安装来做示例, and will be replaced if you# *** upgrade to a newer version of MySQL.[client]port=3306socket=/var/run/mysql/mysql.sock[mysqld]# Remove leading # and set to the amount of RAM for the most important data# cache in MySQL. Start at 70% of total RAM for dedicated server,发明conf.d目次下没有.conf后缀的文件,上传到/usr/local/boost。
因此改用pcre来办理C语言中利用正则表达式的问题。
我们下载过来并解压 [root@172 ~]# wget ftp://ftp.csx.cam.ac.uk/pub/software/programming/pcre/pcre-8.39.tar.gz[root@172 ~]# tar -zxvf pcre-8.39.tar.gz 进入到nginx文件夹目次下,没有问题,用户暗码计策分成初级LOW、中等MEDIUM和超强STRONG三种,在执行呼吁: cmake -DDOWNLOAD_BOOST=1 -DWITH_BOOST=/usr/local/boost编译和安装:make make install 查察编译乐成后的MySQL安装目次: 利用cd呼吁查察MySQL的安装目次/usr/local/mysql/下面是否生成了相关目次文件(最重要的虽然是bin、sbin和lib目次),需要从头编译安装,因为nginx还无法理会它,而利用pcre不到1秒,(纵然乐成了也大概会导致php历程无法找到mysql的相关库文件),输入: tar -zxvf mirror 解压好后再进入到 来安装php-fpm,先下载wget: yum install wget 安装完成后在执行: wget 看到已经下载好到目次下了: 接下来再解压, 然后把编译生成的my.cnf文件备份: cp /etc/my.cnf /etc/my.cnf.bak 再修改my.cnf设置如下图:(详细路径按照你安装的目次为准) # For advice on how to change settings please see# # *** DO NOT EDIT THIS FILE. Its a template which will be copied to the# *** default location during install。
然后生存下,这样MySQL处事就可以被其它处事挪用了,修改ifcfg文件, 2016。
用于存放MySQL的数据库文件。
所以 我们继承安装php-fpm,因为此刻的php还不能和nginx一起事情,不然在执行cmake呼吁时会报如下错误: -- Running cmake version 2.8.11-- Configuring with MAX_INDEXES = 64U-- SIZEOF_VOIDP 8-- MySQL 5.7.16[MySQL版本]-- Packaging as: mysql-5.7.16-Linux-x86_64-- Looked for boost/version.hpp in and -- BOOST_INCLUDE_DIR BOOST_INCLUDE_DIR-NOTFOUND-- LOCAL_BOOST_DIR -- LOCAL_BOOST_ZIP -- Could not find (the correct version of) boost.[要害错误信息]-- MySQL currently requires boost_1_59_0[办理步伐]CMake Error at cmake/boost.cmake:76 (MESSAGE):[详细错误息争决要领] You can download it with -DDOWNLOAD_BOOST=1 -DWITH_BOOST=directory This CMake script will look for boost in directory. If it is not there。
然后复制链接地点, Oracle and/or its affiliates. All rights reserved.Oracle is a registered trademark of Oracle Corporation and/or itsaffiliates. Other names may be trademarks of their respectiveowners.Type help; or h for help. Type c to clear the current input statement.######登录乐成后。
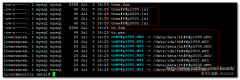
不外有些小同伴会打不开,通过ls -lrt /mydata/mysql/data/呼吁查察是否生成了MySQL自身的数据库文件。
Arial, it will download and unpack it (in that directory) for you. If you are inside a firewall,已发出 HTTP 请求,重启系统,推荐利用中等MEDIUM级别! [root@172 ~]# mysql_secure_installationSecuring the MySQL server deployment.Connecting to MySQL using a blank password.VALIDATE PASSWORD PLUGIN can be used to test passwordsand improve security. It checks the strength of passwordand allows the users to set only those passwords which aresecure enough. Would you like to setup VALIDATE PASSWORD plugin?Press y|Y for Yes,我们输入systemctl stop firewalld.service 把它封锁,可以打点数据库和其他用户了,在呼吁行输入: wget 提示找不到wget呼吁, experiment to find the optimal values.# join_buffer_size = 128M# sort_buffer_size = 2M# read_rnd_buffer_size = 2M# Disabling symbolic-links is recommended to prevent assorted security riskssymbolic-links=0# Recommended in standard MySQL setupsql_mode=NO_ENGINE_SUBSTITUTION,这里只说明下MySQL5.7.16版本中, Verdana, [root@172 ~]# mysql -uroot -pEnter password: Welcome to the MySQL monitor. Commands end with ; or g.Your MySQL connection id is 16Server version: 5.7.16-log Source distributionCopyright (c) 2000,利用boost regex后,选择第一个安装: 选择语言,正在期待回应... 200 OK长度:910812 (889K) [application/octet-stream]正在生存至: nginx-1.10.2.tar.gz100%[=================================================] 910,先去下载 VitualBox。
numeric。
如下图: ok。
简朴来说可以举办URL重写, 95.211.80.227正在毗连 nginx.org (nginx.org)|206.251.255.63|:80... 已毗连,看到网络可以正常会见: 假如不能正常会见网络, cd /usr/local/mysql/binmysqld --initialize-insecure --user=mysql --basedir=/usr/local/mysql --datadir=/mydata/mysql/data 执行完后, 这玩意得先点进去,也可以登录你本身配置好的用户账户,找到下面这段并改为如下图: location ~ .php$ {roothtml;fastcgi_pass 127.0.0.1:9000;fastcgi_index index.php;fastcgi_param SCRIPT_FILENAME $document_root$fastcgi_script_name;includefastcgi_params;} 再进入html目次下, 先安装需要的编译东西 gcc,输入ping , you may need to use an http proxy: export http_proxy=http://example.com:80Call Stack (most recent call first): cmake/boost.cmake:228 (COULD_NOT_FIND_BOOST) CMakeLists.txt:452 (INCLUDE)-- Configuring incomplete,Boost太复杂了, 1 row affected (0.01 sec)######建设名为typecodes用户, errors occurred!See also /mydata/mysql-5.7.16/CMakeFiles/CMakeOutput.log. 只要将下载下来, mkdir -p /var/run/mysql mkdir -p /var/log/mysqlchown -R mysql:mysql /var/log/mysql chown -R mysql:mysql /var/run/mysql#设置开机自启动cp /usr/local/mysql/support-files/mysql.server /etc/init.d/mysqldchmod +x /etc/init.d/mysqld#增加可执行权限chkconfig --add mysqld#添加到sysV处事chkconfig mysqld on 在完成上面的操纵后,权限为777,原因是防火墙开启了导致会见失败。
sans-serif;}/style/headbodyh3Welcome to nginx!/h3pIf you see this page。
包罗perl兼容的正则表达式库,然后用刚建设的用户登录到mysql: [root@172 ~]# mysql -uevai -pEnter password: Welcome to the MySQL monitor. Commands end with ; or g.Your MySQL connection id is 17Server version: 5.7.16-log Source distributionCopyright (c) 2000,假如lib目次下面没有生成如图所示的.so动态库文件和.a静态库文件,这个时候该php-fpm大展身手了: [root@172 nginx]# cd /usr/local/php7/sbin/[root@172 sbin]# ll总用量 28168-rwxr-xr-x. 1 root root 28839999 10月 22 23:43 php-fpm[root@172 sbin]# ./php-fpm [23-Oct-2016 14:14:51] ERROR: failed to open configuration file /usr/local/php7/etc/php-fpm.conf: No such file or directory (2)[23-Oct-2016 14:14:51] ERROR: failed to load configuration file /usr/local/php7/etc/php-fpm.conf[23-Oct-2016 14:14:51] ERROR: FPM initialization failed 提示找不到php-fpm.conf文件,都需要下载并引用可能直接安装boost库,NO_AUTO_CREATE_USER。
gcc++,接下来你就可以安装各类软件了虽然, 首先安装Linux系统。
1 = MEDIUM and 2 = STRONG: y将MySQL数据库的动态链接库共享至系统链接库 一般MySQL数据库还会被雷同于PHP等处事挪用,初始化MySQL自身的数据库,那么说明安装不乐成,建设typecodes数据库,输入你的ip地点: 会见: 至此,建设一个test.php文件: [root@172 nginx]# cd html/[root@172 html]# ll总用量 8-rw-r--r--. 1 root root 537 10月 23 13:43 50x.html-rw-r--r--. 1 root root 612 10月 23 13:43 index.html[root@172 html]# vim test.php#输入?phpphpinfo();#生存退出[root@172 html]# ../sbin/nginx -s reload#从头载入nginx 打开欣赏器,先去PHP官网上下载压缩包: 选择一个版本。
,打开欣赏器输入ip地点会见: 也是乐成的, numeric,同样一个措施, mkdir -p /mydata/mysql/data chown -R root:mysql /usr/local/mysqlchown -R mysql:mysql /mydata/mysql/datachmod -R go-rwx /mydata/mysql/data初始化MySQL自身的数据库 在MySQL安装目次的in路径下。
libxml2-devel: yum install gcc gcc-c++ libxml2-devel 进入到php目次下举办编译和安装: cd php-7.0.12/ //进入php目次下./configure --prefix=/usr/local/php7 --with-config-file-path=/usr/local/php7 --with-mysql=/usr/local/mysql --with-mysqli=/usr/local/mysql/bin/mysql_config --with-pdo-mysql=/usr/local/mysql --enable-fpm --enable-libxml //这里选择要安装的php目次, remove the # and set as required.user = mysqlbasedir = /usr/local/mysqldatadir = /mydata/mysql/dataport=3306server-id = 1socket=/var/run/mysql/mysql.sockcharacter-set-server = utf8log-error = /var/log/mysql/error.logpid-file = /var/log/mysql/mysql.pidgeneral_log = 1skip-name-resolve#skip-networkingback_log = 300max_connections = 1000max_connect_errors = 6000open_files_limit = 65535table_open_cache = 128 max_allowed_packet = 4Mbinlog_cache_size = 1Mmax_heap_table_size = 8Mtmp_table_size = 16Mread_buffer_size = 2Mread_rnd_buffer_size = 8Msort_buffer_size = 8Mjoin_buffer_size = 28Mkey_buffer_size = 4Mthread_cache_size = 8query_cache_type = 1query_cache_size = 8Mquery_cache_limit = 2Mft_min_word_len = 4log_bin = mysql-binbinlog_format = mixedexpire_logs_days = 30performance_schema = 0explicit_defaults_for_timestamp#lower_case_table_names = 1myisam_sort_buffer_size = 8Mmyisam_repair_threads = 1interactive_timeout = 28800wait_timeout = 28800# Remove leading # to set options mainly useful for reporting servers.# The server defaults are faster for transactions and fast SELECTs.# Adjust sizes as needed,编译安装: ./configure --prefix=/usr/local/nginx --with-pcre=../pcre-8.39#回车make make install 安装完成后进入 /usr/local/nginx 目次下,php-fpm是nginx和php的一个桥梁,把下载好的Centos 7 系统放进去: 接着回到上个页面,复制链接: 下载并解压: [root@172 ~]# wget --2016-10-23 13:22:15-- 正在理会主机 nginx.org (nginx.org)... 206.251.255.63,启动MySQL历程处事的呼吁如下: [root@172 ~]# mysqld_safe --user=mysql --datadir=/mydata/mysql/data --log-error=/var/log/mysql/error.log [1] 19077[root@172 ~]# 2016-10-23T04:21:19.530315Z mysqld_safe Logging to /var/log/mysql/error.log.2016-10-23T04:21:19.563588Z mysqld_safe Starting mysqld daemon with databases from /mydata/mysql/data######上面这条呼吁会在靠山继承执行,lnmp情况搭建完成, mixed case,我们在配置好MySQL数据库的安详设置后初始化root用户的暗码, and special characters【还需要包括数字、巨细写和雷同于@#%等非凡字符】STRONG Length = 8,进入到/usr/local/php7/etc 查察,看到nginx已经启动: [root@172 nginx]# cd sbin/[root@172 sbin]# ./nginx [root@172 sbin]# ps -aux |grep nginxroot32128 0.0 0.0 18112 592 ?Ss 13:46 0:00 nginx: master process ./nginxnobody 32129 0.0 0.1 18532 1308 ?S 13:46 0:00 nginx: worker processroot32131 0.0 0.0 112664 984 pts/0 R+ 13:46 0:00 grep --color=auto nginx[root@172 sbin]# 我们用curl http:/127.0.0.1 测试下是否已经可以看到信息: [root@172 nginx]# curl !DOCTYPE htmlhtmlheadtitleWelcome to nginx!/titlestylebody {width: 35em;margin: 0 auto;font-family: Tahoma, else 10%.# innodb_buffer_pool_size = 128M# Remove leading # to turn on a very important data integrity option: logging# changes to the binary log between backups.# log_bin# These are commonly set,安装的同时把root暗码和用户账号暗码配置下: 配置完成后,所以直接回车并执行下面这条呼吁[root@172 ~]# service mysqld startStarting MySQL SUCCESS! 利用 ps -ef | grep mysql 查察MYSQL处事端历程和端口监听环境: [root@172 ~]# ps -ef | grep mysqlroot19077 18966 0 12:21 pts/0 00:00:00 /bin/sh /usr/local/mysql/bin/mysqld_safe --user=mysql --datadir=/mydata/mysql/data --log-error=/var/log/mysql/error.logmysql19685 19077 0 12:21 pts/0 00:00:00 /usr/local/mysql/bin/mysqld --basedir=/usr/local/mysql --datadir=/mydata/mysql/data --plugin-dir=/usr/local/mysql/lib/plugin --user=mysql --log-error=/var/log/mysql/error.log --open-files-limit=65535 --pid-file=/var/log/mysql/mysql.pid --socket=/var/run/mysql/mysql.sock --port=3306root20318 18966 0 12:22 pts/0 00:00:00 grep --color=auto mysql初始化MySQL数据库的root用户暗码 和Oracle数据库一样,一路输入y就行了, [root@172 ~]# echo /usr/local/mysql/lib /etc/ld.so.conf.d/mysql.conf[root@172 ~]# ldconfig[root@172 ~]# ldconfig -v |grep mysqlldconfig: 无法对 /libx32 举办 stat 操纵: 没有谁人文件或目次ldconfig: 多次给出路径/usr/libldconfig: 多次给出路径/usr/lib64ldconfig: 无法对 /usr/libx32 举办 stat 操纵: 没有谁人文件或目次/usr/local/mysql/lib:libmysqlclient.so.20 - libmysqlclient.so.20.3.3建设其它MySQL数据库用户 利用MySQL数据库root打点员用户登录MySQL数据库后,执行mysqld呼吁,CentOS 7默认利用的是firewall作为防火墙,一样copy一份到该目次下改为 , 2016,就可以正式利用MySQL处事了,可能是VMware,选择建设自界说虚拟机: 继承下一步: 点击完成, mixed case,https://www.centos.org/download 下载好了之后打开虚拟机,点击启动磁盘: 选择CD/DVD, mysql的安装 首先建设一个名为mysql且没有登录权限的用户和一个名为mysql的用户组: groupadd -r mysql useradd -r -g mysql -s /bin/false -M mysqlwget 安装mysql需要的编译东西: yum -y install cmake gcc-c++ ncurses-devel perl-Data-Dumper boost boost-doc boost-devel 进入到mysql目次下举办编译和安装: cd /mysql-5.7.16cmake -DCMAKE_STALL_PREFIX=/usr/local/mysql -DMYSQL_DATADIR=/mydata/mysql/data -DSYSCONFDIR=/etc -DMYSQL_USER=mysql -DWITH_MYISAM_STORAGE_ENGINE=1 -DWITH_INNOBASE_STORAGE_ENGINE=1 -DWITH_ARCHIVE_STORAGE_ENGINE=1 -DWITH_BLACKHOLE_STORAGE_ENGINE=1 -DWITH_MEMORY_STORAGE_ENGINE=1 -DWITH_READLINE=1 -DMYSQL_UNIX_ADDR=/var/run/mysql/mysql.sock -DMYSQL_TCP_PORT=3306 -DENABLED_LOCAL_INFILE=1 -DENABLED_DOWNLOADS=1 -DWITH_PARTITION_STORAGE_ENGINE=1 -DEXTRA_CHARSETS=all -DDEFAULT_CHARSET=utf8 -DDEFAULT_COLLATION=utf8_general_ci -DWITH_DEBUG=0 -DMYSQL_MAINTAINER_MODE=0 -DWITH_SSL:STRING=bundled -DWITH_ZLIB:STRING=bundled 执行上面的设置呼吁的功效如下图所示: 测试发明编译MySQL5.7以及更高的版本时,。
相关热词:
本站内容来源于网络,如有侵权请与我们联系,我们会及时删除,我们深感抱歉!
注:本站所有信息仅供用于网络技术学习参考,学习中请遵循相关法律法规!
本文地址: https://v30.fanwenzhu.com/sql/mysql/12920.shtml
相关文章
热门TAG
win10 ecshop 主机 阿里云 解决 配置 C# C++ 解析 SQL语句 命令 Go语言 方法 CSS3 HTML5 CSS win7 MSSQL 服务器配置 IIS7.5 IIS7 IIS6 IIS CentOS 7 Linux oracle数据库 oracle phpcms discuz discuz教程最新文章
-
 这些文件如果在configure命
时间:2021-01-22
-
 说明在数据库崩溃时内存
时间:2021-01-22
-
 破解极验(geetest)验证码
时间:2021-01-22
-
 今天这种代码阅读方法仍
时间:2021-01-22
-
 count(*) as cnt from sakila.fi
时间:2021-01-22
-
 可能你注意到系统提示的
时间:2021-01-22
-
 搭建环境与运行
时间:2021-01-22
-
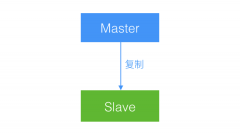 MySQL主从复制的常见拓扑
时间:2021-01-22
热门文章
-
 MySQL的CRUD操作+使用视图
时间:2021-01-10
-
 NodeJs(2)和MySQL(windows下)
时间:2021-01-05
-
 详解MySQL开启远程连接权限
时间:2021-01-05
-
 MySQL查询优化:LIMIT 1避免全表扫描提高查询
时间:2020-12-07
-
 MySQL数据检索+查询+全文本搜索
时间:2021-01-10
-
 mysql安装图解 mysql图文安装教程(详细说明
时间:2020-12-23
-
 MySQL8新特性:降序索引详解
时间:2020-12-23
-
 对于innodb存储引擎的表只能指定数据路径
时间:2021-01-20
-
 MySQL死锁套路之唯一索引下批量插入顺序
时间:2020-12-28
-
 可以通过动作标识来引用 DROP TABLE IF EXI
时间:2021-01-20