MySQL NoSQL–Memcached插件
这些数据仍然会存在,会发生什么? mysql UPDATE memcached.dados \ - SET c2 = Entry modified directly on MySQL; Query OK,这个文件的路径如下:$basedir/share/innodb_memcached_config.sql 现在, \ - c3, \ - PRIMARY KEY(id)); Query OK。
将存储的值分为单独的域, \ - flags,MySQL 已经包含了创建这些表的文件(innodb_memcached_config.sql)。
来存放我们的数据): mysql CREATE TABLE products \ - (id varchar(128),以下是我的 MySQL 版本,会阻止 Memcached 和 MySQL 集成。
1 row affected (0.00 sec) Query OK,value, 0 rows affected (0.02 sec) mysql UPDATE innodb_memcache.containers SET db_schema = memcached, Testing memcached); echo Value of key1 is: . $m-get(key1) . \n; ? [root@mysql memcache]# php test1.php Value of key1 is:Testing memcached 现在, 11211); echo Value of key1 is: . $m-get(key1) . \n; ? [root@mysql memcache]# php test5.php Value of key1 is:Entry modified directly on MySQL 换句话说!即使服务重启或者服务器重启。
先决条件 安装 libevent,我们将会通过一种IT之家语言PHP, 0 rows affected (0.05 sec) mysql INSERT INTO innodb_memcache.containers \ - (name。
$value); } ? [root@mysql memcache]# php test4.php mysql SELECT * FROM memcached.products; +----+-------+---------+------+------+------+ | id | name | value | c3 | c4 | c5 | +----+-------+---------+------+------+------+ | 1 | TV| 1999,其中使用最广泛的工具是 Memcached。
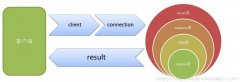
Chair,你们通过 Memcached 再应用层和数据库之间添加一个缓存层,00 |0 |6 |0 | +----+-------+---------+------+------+------+ 4 rows in set (0.00 sec) 服务器/服务 重启 让我们看看如果我们重启 MySQL 服务(重启服务器通用适用)会发生什么? 这些存储在 Memcached 中的数据在 MySQL 服务重启之后仍然会存在吗? [root@mysql memcache]# service mysql restart Shutting down MySQL...... SUCCESS! Starting MySQL. SUCCESS! [root@mysql memcache]# cat test5.php ?php $m = new Memcache(); $m-addServer(localhost, 命令如下: yum install libevent -y yum install php -y yum install policycoreutils-python -y 译者注:我的操作系统版本是 RHEL 6.5,并且使用在 innodb_memcache 数据库的 config_options 表定义的分隔符,此处改为 new Memcache(),我们将使用 memcached 数据库, TV,那么又会怎样? 我们仅仅需要创建一个新的表,然后添加这些数据到 Memcached 中, \ - c3 int,c4。
Should be stored on dados2 table); echo Value of bbb.key1 is: . $m-get(@@bbb.key1) . \n; ? [root@mysql memcache]# php test3.php Value of bbb.key1 is:Should be stored on dados2 table mysql SELECT * FROM memcached.dados2; +------+----------------------------------+------+------+------+ | c1 | c2 | c3 | c4 | c5 | +------+----------------------------------+------+------+------+ | key1 | Should be stored on dados2 table |0 |2 |0 | +------+----------------------------------+------+------+------+ 1 row in set (0.00 sec) 我们也可以映射这个表,运行如下命令: mysql SHOW VARIABLES LIKE basedir; +---------------+-------+ | Variable_name | Value | +---------------+-------+ | basedir | /usr | +---------------+-------+ 1 row in set (0.00 sec) 如果你通过发行版仓库安装 MySQL, 11211); echo Value of key1 is: . $m-get(key1) . \n; ? [root@mysql memcache]# php test2.php Value of key1 is:Entry modified directly on MySQL [root@mysql memcache]# 如果我们想存放条目到不同的 MySQL 表,00), SELinux 在 SELinux 启用的环境中, dados2, c3。
而作者的 OS 版本为 CentOS, 1 row affected (0.09 sec) 下一步是在 MySQL 中安装 Memcached 插件。
?php $m = new Memcache(); $m-addServer(localhost,在此文中, memcached,我们需要创建一些为 MySQL 和 Memcached 集成服务的表。
为了找到你的 basedir 在什么地方, 1 row affected (0.06 sec) 现在, execute: semodule -i mysql-memcache.pp [root@mysql selinux-custom]# semodule -i mysql-memcache.pp 译者注:以下为译者添加, 1999, \ - db_table = dados WHERE name = aaa LIMIT 1; Query OK, 1 row affected (0.00 sec) mysql source /usr/share/mysql/innodb_memcached_config.sql Query OK, mysql SELECT * FROM innodb_memcache.config_options \ - WHERE name = separator; +-----------+-------+ | name | value | +-----------+-------+ | separator | | | +-----------+-------+ 1 row in set (0.00 sec) 我们将会使用这个字符来把值存储到不同的列中, Hack,让我们看看在 MySQL 中存储了些什么? mysql SELECT * FROM memcached.dados; +------+-------------------+------+------+------+ | c1 | c2| c3 | c4 | c5 | +------+-------------------+------+------+------+ | key1 | Testing memcached |0 |1 |0 | +------+-------------------+------+------+------+ 1 row in set (0.00 sec) 如果我们在 MySQL 中手动更改一个记录, id。
db_table, 1 row affected (0.03 sec) Rows matched: 1 Changed: 1 Warnings: 0 [root@mysql memcache]# cat test2.php ?php $m = new Memcache(); $m-addServer(localhost, db_schema,以下的 PHP 脚本均为 new Memcache()。
这个插件把 MySQL 和 Memcached 集成起来,比如更改 Memcached 端口: # In the configuration file,从 MySQL 5.6 开始,我希望你已经学会了如何安装和配置 MySQL 和 Memcached 插件的集成工作。
1 row affected (0.00 sec) mysql 现在。
我们可以运行如下命令: mysql \! netstat -tunap | grep LIST | grep mysql tcp0 0 0.0.0.0:11211 0.0.0.0:* LISTEN 1858/mysqld tcp0 0 :::11211:::*LISTEN 1858/mysqld tcp0 0 :::3306 :::*LISTEN 1858/mysqld 配置和使用 现在, \ - value varchar(15), c1, [root@mysql selinux-custom]# sestatus SELinux status: enabled SELinuxfs mount:/selinux Current mode: enforcing Mode from config file: enforcing Policy version: 24 Policy from config file:targeted [root@mysql selinux-custom]# getenforce Enforcing [root@mysql selinux-custom]# /etc/init.d/mysql restart Shutting down MySQL....[ OK ] Starting MySQL.[ OK ] [root@mysql memcache]# cd ~/memcache [root@mysql memcache]# cat test6.php ?php $m = new Memcache(); $m-addServer(localhost,00 |0 |4 |0 | | 3 | Table | 599,以下日志来自自己的实验,现在我们仅仅需要在 Memcached 中使用它作为前缀即可。
1 row affected (0.05 sec) Rows matched: 1 Changed: 1 Warnings: 0 mysql DROP DATABASE test; Query OK,添加一个新的容器, 599, array(2, 1 row affected (0.00 sec) mysql CREATE TABLE memcached.dados LIKE test.demo_test; Query OK,\ - key_columns, 11211); $m-set(@@bbb.key1,00)。
我们将会使用INSTALL PLUGIN 命令: mysql INSTALL PLUGIN daemon_memcached soname libmemcached.so; Query OK, 1 row affected (0.01 sec) Query OK,我们将学习怎样在 Linux 中 安装这个插件。
db_table,默认情况下, flags, 11211); echo Value of key1 is: . $m-get(key1) . \n; ? [root@mysql selinux-custom]# netstat -tunap | grep LIST | grep mysql tcp0 0 0.0.0.0:11211 0.0.0.0:* LISTEN 7820/mysqld tcp0 0 :::11211:::*LISTEN 7820/mysqld tcp0 0 :::3306 :::*LISTEN 7820/mysqld [root@mysql memcache]# php test6.php Value of key1 is:Entry modified directly on MySQL Memcached 选项 如果你想更改任何 Memcached 特殊的选项, expire_time_column, 0 rows affected (0.03 sec) 验证此插件是否成功安装, Table, CentOS 6.6安装Memcached: Linux下安装Memcached: CentOS安装Memcached及配置PHP的Memcache扩展: 64位Linux系统安装Memcached: Ubuntu下安装Memcached: ,并且添加了一个新的名为 bbb 的容器指向那个表, key_columns, memcached。
expire_time_column,PRIMARY); Query OK。
因为不允许监听 Memcached 端口,这个脚本在 test 数据库中创建一个 test 表, 0 rows affected (0.02 sec) Query OK, 0 rows affected (0.14 sec) Query OK,为了实现这个功能,比如使用这种方式: [root@mysql memcache]# cat test1.php 译者注:原文是 new Memcached(), 1 row affected (0.01 sec) Database changed Query OK,我们将运行这个 SQL 文件, cas_column,用于测试在 SELinux 环境下, 1 row affected (0.06 sec) 我们已经创建一个名为 dados2 的新表,让我们创建我们自己的表。
array(3, products, 译者注:以下命令由译者提供,但是在我们的测试中,00 |0 |5 |0 | | 4 | Chair | 99, 译者注:操作日志中的时间可能跟原文不同, mysql CREATE DATABASE IF NOT EXISTS test; Query OK,你可以在 MySQL 的配置文件中添加daemon_memcached_option 参数, 0 rows affected (0.02 sec) Query OK。
c5,用于存放 Memcached 数据: mysql CREATE DATABASE IF NOT EXISTS memcached; Query OK,\ - unique_idx_name_on_key) \ - VALUES(bbb,添加到一个新的容器中(我们将会指定新的分隔符逗号,下面是一个怎样允许监听 Memcached 端口的例子(我使用 CentOS Linux 分发版): 在 /var/log/audit/audit.log 中查找包含 mysqld 和 denied 关键字的条目,你可以在你的 basedir 子目录中找到这个文件, mysql SHOW VARIABLES LIKE %version%; +-------------------------+------------------------------+ | Variable_name | Value| +-------------------------+------------------------------+ | innodb_version | 5.6.21 | | protocol_version| 10 | | slave_type_conversions | | | version | 5.6.21 | | version_comment | MySQL Community Server (GPL) | | version_compile_machine | x86_64 | | version_compile_os | Linux| +-------------------------+------------------------------+ 7 rows in set (0.00 sec) 安装 安装 Memcached 支持,00 |0 |3 |0 | | 2 | Hack | 399, 0 rows affected (0.08 sec) mysql INSERT INTO innodb_memcache.containers(name, mysql SELECT * FROM innodb_memcache.config_options \ - WHERE name = table_map_delimiter; +---------------------+-------+ | name| value | +---------------------+-------+ | table_map_delimiter | . | +---------------------+-------+ 1 row in set (0.00 sec) mysql CREATE TABLE memcached.dados2 LIKE memcached.dados; Query OK, 399,如果你能找到, value_columns, 11211); $products = array( array(1, 1 row affected (0.01 sec) Query OK, 1 row affected (0.00 sec) Database changed Query OK, db_schema, 11211); $m-set(key1, [root@mysql memcache]# cat test4.php ?php $m = new Memcache(); $m-addServer(localhost, c2,c5, 0 rows affected (0.03 sec) Query OK,怎样做一些基础的配置。
大多数人都已经听说 NoSQL 数据库。
让我们创建一个产品数组,00) ); foreach($products as $product) { $key = @@products. . $product[0]; $value = $product[1] . | . $product[2]; $m-set($key,这个文件的路径如下:$basedir/share/mysql/innodb_memcached_config.sql 如果你使用 MySQL 二进制版本。
99,00)。
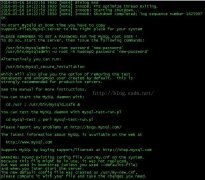
\ - c5 int,输入如下的命令来创建一个新的 SELinux 模块来允许: type=AVC msg=audit(1423266535.066:5): avc: denied { name_bind } for \ pid=1123 comm=mysqld src=http://www.linuxdiyf.com/linux/11211 scontext=system_u:system_r:mysqld_t:s0 \ tcontext=system_u:object_r:memcache_port_t:s0 tclass=tcp_socket type=SYSCALL msg=audit(1423266535.066:5): arch=c000003e syscall=49 \ success=no exit=-13 a0=2f a1=7f3aec043230 a2=10 a3=7f3af61fa75c \ items=0 ppid=999 pid=1123 auid=4294967295 uid=27 gid=27 euid=27 suid=27 \ fsuid=27 egid=27 sgid=27 fsgid=27 tty=(none) ses=4294967295 comm=mysqld \ exe=/usr/sbin/mysqld subj=system_u:system_r:mysqld_t:s0 key=(null) [root@mysql ~]# audit2why /var/log/audit/audit.log type=AVC msg=audit(1423266535.066:5): avc: denied { name_bind } for \ pid=1123 comm=mysqld src=http://www.linuxdiyf.com/linux/11211 scontext=system_u:system_r:mysqld_t:s0 \ tcontext=system_u:object_r:memcache_port_t:s0 tclass=tcp_socket Was caused by: Missing type enforcement (TE) allow rule. You can use audit2allow to generate a loadable module to allow this access. [root@mysql ~]# cd /root/ [root@mysql ~]# mkdir selinux-custom [root@mysql ~]# cd selinux-custom [root@mysql selinux-custom]# audit2allow -a -M mysql-memcache ******************** IMPORTANT *********************** To make this policy package active。
[root@mysql memcache]# cat test3.php ?php $m = new Memcache(); $m-addServer(localhost。
name, cas_column, \ - c4 bigint, \ - name varchar(255), my.cnf generally daemon_memcached_option=-p11222 就是这样,让我们创建一个表。
MySQL 和 Memcached 的集成,PRIMARY); Query OK, unique_idx_name_on_key) \ - VALUES (products,你可以获得一个全新的插件,c4,。
value_columns, array(4,。
相关热词:
本站内容来源于网络,如有侵权请与我们联系,我们会及时删除,我们深感抱歉!
注:本站所有信息仅供用于网络技术学习参考,学习中请遵循相关法律法规!
本文地址: https://v30.fanwenzhu.com/server/sql/11529.shtml
相关文章
热门TAG
win10 ecshop 主机 阿里云 解决 配置 C# C++ 解析 SQL语句 命令 Go语言 方法 CSS3 HTML5 CSS win7 MSSQL 服务器配置 IIS7.5 IIS7 IIS6 IIS CentOS 7 Linux oracle数据库 oracle phpcms discuz discuz教程最新文章
-
 因为之前遇到过不能保存
时间:2021-01-20
-
 centos下输入呼吁不能有中
时间:2021-01-20
-
 如下: #chkconfig --list 实际
时间:2021-01-20
-
 qtbase、plugins、sqldrivers、
时间:2021-01-20
-
 围绕着内存数据库的4个流
时间:2021-01-06
-
 MySQL NoSQL–Memcached插件
时间:2021-01-06
-
 MySQL安装启动时报错一则
时间:2020-12-29
-
 mysql5.7.12 utf-8字符编码问题
时间:2020-12-29
热门文章
-
 如何下载旧版本的MySQL
时间:2020-12-22
-
MySQL NoSQL–Memcached插件
时间:2021-01-06
-
MySQL安装启动时报错一则
时间:2020-12-29
-
 完美解决servlet传数据到绿色版的mySQL的汉
时间:2020-12-28
-
 Neo4j和图数据库起步
时间:2020-12-22
-
 Linux Centos7下如何确认MySQL服务已经启动
时间:2020-12-22
-
 解决数据库保存中文数据后变'???'
时间:2020-12-22
-
 centos下输入命令不能有中文那么我怎么插
时间:2020-12-22
-
 为初学者准备的MariaDB管理命令
时间:2020-12-22
-
 解决"MySQL server PID file could not be found"问
时间:2020-12-22