Nginx与Lua灰度发布的实现
3
4
5
6
7
8
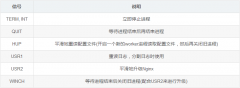
yum install -y memcached
#启动memcached服务,端口11211,以nobody身份启动,-d后台模式运行
memcached -p11211 -u nobody -d
#将自己的IP设为灰度测试的IP
telnet 127.0.0.1 11211
set 119.32.216.122 0 0 1
1
quit
安装 memcached for lua
1
2
3
4
wget https://github.com/openresty/lua-resty-memcached/archive/v0.11.tar.gz
tar -zxvf v0.11.tar.gz
mkdir -p /usr/local/share/lua/5.1
cp -r lua-resty-memcached-0.11/lib/resty /usr/local/share/lua/5.1
创建 test.lua 文件
1
2
3
4
5
6
7
8
9
10
11
12
13
14
15
16
17
18
19
20
21
22
23
24
25
26
27
28
29
clientIP=ngx.req.get_headers()["X-Real-IP"]
if clientIP == nil then
clientIP=ngx.req.get_headers()["x_forwarded_for"]
end
if clientIP == nil then
clientIP=ngx.var.remote_addr
end
local memcached=require "resty.memcached"
local memc,err=memcached:new()
if not memc then
ngx.say("failed to instantiate memc:",err)
return
end
local ok,err =memc:connect("127.0.0.1",11211)
if not ok then
ngx.say("failed to connect:",err)
return
end
local res,flags,err =memc:get(clientIP)
--ngx.say("value key: ",res,clientIP)
if err then
ngx.say("failed to get clientIP",err)
return
end
if res == "1" then
ngx.exec("@server_test")
return
end
ngx.exec("@server_product")
nginx配置
1
2
3
4
5
6
7
8
9
10
11
12
13
14
15
16
17
18
19
20
21
22
23
24
25
26
27
server {
listen 8867;
server_name ;
root /usr/local/nginx/1.12.1/html;
location / {
content_by_lua_file /etc/nginx/test.lua;
}
location /hello {
default_type text/plain;
content_by_lua 'ngx.say("hello lua")';
}
location /ua {
default_type text/plain;
content_by_lua '
clientIP=ngx.req.get_headers()["USER-AGENT"]
ngx.say("IP:",clientIP)
';
}
location @server_product {
default_type text/plain;
return 200 'product';
}
location @server_test {
default_type text/plain;
return 200 'test';
}
}
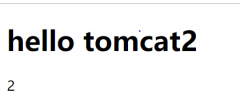
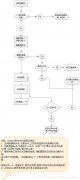
由于我们将 119.32.216.122 这个IP添加进了memcached中,因此访问 :8867/ 的时候,看到的内容就是 test
而开启全局代理之后,发现看到的内容就是 product,这样就实现了针对部分用户进行灰度测试的效果
到此这篇关于Nginx与Lua灰度发布的实现的文章就介绍到这了,更多相关Nginx与Lua灰度发布内容请搜索聚合云库文库以前的文章或继续浏览下面的相关文章希望大家以后多多支持聚合云库文库!
原文链接:https://segmentfault.com/a/1190000022194409
相关热词:
本站内容来源于网络,如有侵权请与我们联系,我们会及时删除,我们深感抱歉!
注:本站所有信息仅供用于网络技术学习参考,学习中请遵循相关法律法规!
本文地址: https://v30.fanwenzhu.com/server/nginx/8807.shtml
相关文章
热门TAG
win10 ecshop 主机 阿里云 解决 配置 C# C++ 解析 SQL语句 命令 Go语言 方法 CSS3 HTML5 CSS win7 MSSQL 服务器配置 IIS7.5 IIS7 IIS6 IIS CentOS 7 Linux oracle数据库 oracle phpcms discuz discuz教程最新文章
-
 并且强制用 HTTPS 访问 fa
时间:2021-01-14
-
 可以控制访问量
时间:2021-01-14
-
 (通配符在前) ③server
时间:2021-01-14
-
 Nginx环境下WordPress的多站点
时间:2021-01-05
-
 nginx keepalive的具体使用
时间:2021-01-05
-
 Nginx的信号控制
时间:2021-01-05
-
 win10上安装nginx的方法步骤
时间:2020-12-29
-
 linux下 nginx监控问题
时间:2020-12-29
热门文章
-
可以控制访问量
时间:2021-01-14
-
Nginx环境下WordPress的多站点功能配置详解
时间:2021-01-05
-
 Nginx搭建负载均衡集群的实现
时间:2020-12-24
-
 使用Nginx实现灰度发布的使用
时间:2020-12-25
-
 nginx+tomcat 通过域名访问项目的实例
时间:2020-12-25
-
 Keepalived+Lvs+Nginx搭建Nginx高可用集群
时间:2020-12-23
-
 详解Nginx之Location配置(Location匹配顺序)
时间:2020-12-28
-
 详解基于centos7搭建Nginx网站服务器(包含
时间:2020-12-28
-
 详解Nginx如何配置Web服务器的示例代码
时间:2020-12-25
-
 自动化Nginx服务器的反向代理的配置方法
时间:2020-12-25